MAKE IT CUTE
DIYs
#ManiMonday: Say aloha to these vacay vibes

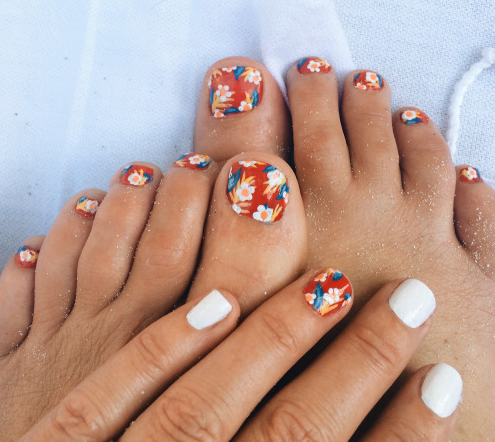
Most of us would die to jet off to a tropical island and spend the summer basking in the sun and frolicking in warm waters. Sadly, that’s not always a realistic option. Instead, try these Aloha-shirt inspired nails for a pop of color and a dash of tropical vacay vibes.
What you’ll need: Red nail polish • yellow nail polish • white nail polish • blue-green nail polish • baby blue nail polish • clear top coat • toothpick or ball point pen
Directions
1. After applying your base coat, paint your nails with two coats of red nail polish. Let dry completely.
2. Palm leaves: Dip your toothpick or ball point pen in yellow nail polish and draw the palm leaves using short strokes and gentle pressure. Paint a long line with shorter lines extending outwards. Let dry.
3. Flowers: Using white nail polish, paint a cluster of five dots, then connect them together in the center to make a flower shape. Let dry, then add a dot of yellow or blue-green nail polish at the center.
4. Large leaves: Dip your toothpick or ball point pen in blue-green nail polish and draw the larger leaves. Let dry, then paint a streak of baby blue nail polish through the center of the leaves as an accent.
5. There’s no “correct” way of arranging each of the elements, so have fun and experiment!
6. Let all nails dry, then seal with a top coat to preserve your mani.
7. Voila! You’ve got some seriously adorable nails to sport this summer.
Tip: You can choose any color combination for this look, but we like using a complementary color scheme (e.g. red and green, orange and blue, yellow and purple) for a bold and striking look. So if you want orange as your base, try adding blue flowers—they’ll stand out and sizzle on your nails.
How do you step up your mani game in the summer?
Tutorial and photo credit: Goldfish Kiss
POSTED IN MAKE IT CUTE, DIYs, STYLE, Beauty, diy mani

 become a contributor


