STYLE
Beauty
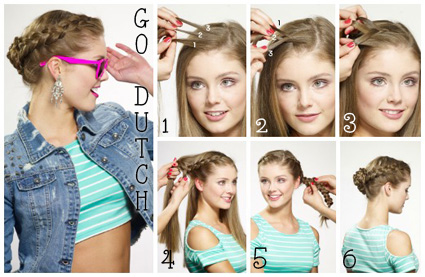
Get the look: 6 steps to a cinchy Dutch braid

Love this look? You can find braiding specialist Isabel Guillen at The John Barrett Salon’s Braid Bar, tucked inside Bergdorf Goodman in NYC, and at johnbarrett.com.
Love this post? You'll heart these too...
+ Get The Look! Score style secrets with our weekly fash newsletter
+ Swimsuits that flatter your figure
WIN BIG! Stock your wardrobe with $1000 worth of 15-Fifteen jeans.
Oh snap! Get the latest from GL on Instagram
-

1. On the heavy side of your part, grab a 3-inch bit of hair and divide it into three small and equal sections.
-

2. Alternate pulling each outer section under and toward the middle: Weave section 1 under 2, 3 under 1, 2 under 3.
-

3. Repeat step 2, feeding in more hair from each outer side as you move along the hairline, pulling tight.
-

4. At mid-ear level, pull locks up to the back of your head. Braid normally (as in, don’t add hair!). Secure end with tie.
-

5. Repeat steps 1-4 on opposite side, creating a mirrored braid. Loosen both braids for a little bit of messy texture
-

6. Twist both braids together to form a bun at the back of your head. Secure with pins, then mist all over with hairspray.
-

The finishing touch: Snap a pic to Twitter or Instagram with the hashtag #GLgirl. Fab!
POSTED IN Beauty, hair, how to, tips, summer, In the mag, June/July 2013

 become a contributor


 VIEW THUMBNAILS


